August 03, 2022
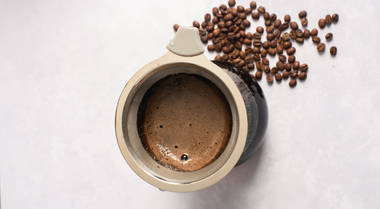
Making a pour over coffee can seem tedious to some, but the final result is always worth the time and effort. When done correctly, a pour over coffee is one of the cleanest, most nuanced coffees a barista can make. Every factor of the brewing process, from temperature, time, and dosage, is carefully monitored to ensure a perfect cup.
Nailing a pour over takes some special equipment, some practice, and most importantly, some time; therefore, itâs best to make this coffee ritual something you look forward to in your routine. Usually intended for making small batches, the pour over method should feel like a delicious gift made with care.
How Pour Over Differs
When using espresso machines, auto-drip machines, or even stovetop Mokas, much of the control is taken away from the barista. Factors like temperature, pressure, and extraction time are mostly determined by your equipment, requiring you to troubleshoot to find the right balance between the three. Pour over, on the other hand, gives you complete control over the brewing experience.
What Youâll Need
The pour over method requires more equipment than most brewing methods, with very little room for substitution. Before beginning, ensure that you have everything ready to brew since subtle nuances can make a big difference in the final product. Here is what youâll need:
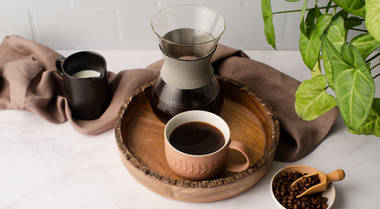
â Glass carafe made specifically for pour over (i.e., the
Lardera Pour Over Coffeemaker or the
Lardera Pour Over Decanter)
â
Pour over dripper or brew cone
â
Paper coffee filters
â
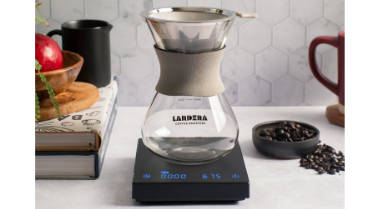
Digital Scale and Timer
â
Gooseneck Water Kettle
â
Coffee
â
Coffee grinder (or pre-ground coffee)
â Filtered water
There are a few specifications regarding necessary equipment that make a significant difference when brewing pour over coffee. A gooseneck water kettle offers better control when saturating your coffee grounds, which is important for achieving a balanced flavor. Lardera's
Smart Electric Kettle not only provides that extra control but comes with a no-drip feature, easy-grip handle, and an anti-scalding lid to guarantee safety when handling boiling water.
When it comes to using paper coffee filters, itâs mostly up to each personâs personal preference. The paper filter absorbs the coffeeâs natural oils and produces a smooth, clean-tasting cup.
If you enjoy coffee with more texture, such as when making a
French Press, using your brew cone on its own will do just fine. Pour over drippers require paper filters and are best used for brewing individual cups of coffee.
The Delicate Brewing Process
Step one of making a pour over coffee is heating your electric kettle to the correct temperature. Youâll want to heat your filtered water to a temperature between 195-205ºF. Itâs now time to preheat your other equipment to keep a steady temperature throughout the entire process.
Place your brew cone inside your carafe or pour over dripper on top of your mug, depending on your method. Pour hot water on top of your brew cone to preheat the filter. When using paper filters, do the same by evenly dampening the paper. Next, discard the hot water thatâs inside your carafe or mug.
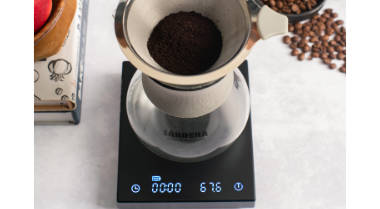
Your equipment has now been properly warmed up, which means itâs time to add your coffee. If grinding your coffee, youâll want to aim for a medium-coarse grind. Too fine of a grind will create a grainy, over-extracted brew, while too coarse of a grind will make your coffee taste under-extracted.
Regarding dosage, we recommend weighing out 30g of coffee on your digital scale to produce two cups of pour over. 500g of water is the recommended dosage for this much coffee.
Place your ground coffee into your brew cone or dampened coffee filter, and ensure it is evenly distributed. Next, place either your carafe or mug on your digital scale and hit tare.
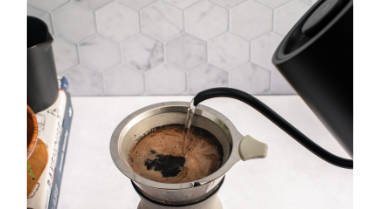
Itâs now time to extract your coffee. Pour a small amount of hot water on your coffee grounds in a circular motion. Youâll notice that your coffee expands in size, and a layer of foam rises to the top. This is called âdegassingâ or âblooming,â which releases all of your coffeeâs CO2 and natural flavors from the grounds. Set your timer for one minute and let your coffee bloom before proceeding with next steps.
Once your coffee has bloomed, begin slowly pouring hot water onto your coffee in a circular motion, starting at the center and gradually expanding into the outer edges. When your coffee is fully saturated, allow the coffee to drip into your carafe or mug slowly. After the coffee has dripped into the carafe or mug, itâs time for the second pour. Repeat the same process and allow your coffee to brew slowly. Once the coffee has filled the carafe or mug, your pour over is complete!
The Timing
When pouring water into your dripper, aim to keep it between halfway and three-quarters of the way full throughout the brewing process. The exact amount of time each pour will take will vary depending on the amount of coffee and water being used, but it should typically fall somewhere between 20-60 seconds each time. The brewing process should fall between three to four minutes, total. Use your time to ensure each pour is falling within the correct range and that your brewed coffee is not under or over-extracting.