July 27, 2022
Enjoying a cold beverage on a warm summer day is always a treat, but that experience shouldnât feel limited to iced teas or colas. Coffee can also be a refreshingly cold beverage all year round as a delicious cold brew, with its specific brewing style presenting a unique flavor experience from the standard drip.
While cold brew can trace back its roots to 17th-century Japan, it now exists as a coffee staple. Specialty coffee shops pride themselves on their carefully crafted cold brews, and grocery stores carry pre-made cold brew products for easy consumption. In other words, it appears that cold brew is a longtime trend that is here to stay and will likely grow in popularity in years to come. But enjoying a glass of cold brew is not solely something you can do outside the home, with making your own batches of iced coffee at home also growing in trend. Here is how you can make flavorful cold brew at home.
How Cold Brew Differs
Cold brew is not solely iced coffee. The name of the popular beverage actually refers to its particular brewing method that yields different results from chilling drip coffee or an iced americano. Making cold brew is all about long and gentle extractions without heat, making it the opposite of espresso brewing. Youâll need some equipment to properly make quality cold brew at home, but the most important factor is time.
What Youâll Need
To make cold brew at home, youâll need the following:
â A lidded
vessel
â A
digital scale
â
Coffee grinder (or pre-ground coffee)
â
Coffee
â A strainer (this is included in the
Cold Brew Pitcher)
â Filtered water
The vessel youâll need for cold brew can vary in size, but varying quantities of water and coffee will ultimately influence the taste of your cold brew. To make four cups of cold brew, we typically recommend 32oz of water and 70g of coffee.
The coffee you choose for your cold brew is also dependent on personal preference; however, not all grind sizes make the same brew. When it comes to making cold brew, you want to use coarser grounds rather than finer or espresso-style coffee. Coarse grounds create less surface area during the brewing process, meaning water cannot extract coffeeâs flavor as easily and requires more time to get an even extraction. Since this is a lengthier brewing process, coarser grinds will give you a balanced cup thatâs not over-infused or grainy in texture.
Zero Heat Isnât Always The Case
Although it was previously stated that cold brew requires zero heat to make, some coffee drinkers who use heat to speed up the process. High temperatures extract flavor from coffee grounds much quicker and bloom the coffee, similar to how spices unleash their properties when they toast on a skillet.
However, using heat when making cold brew requires specific equipment and temperature control to avoid bitter flavors in your cup. The key to executing this step is to bloom your coffee and allow it to rapidly cool down before storing in your fridge.
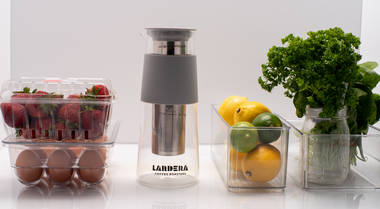
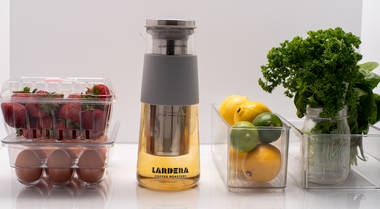
An example of a proper vessel to use is our
Lardera Cold Brew Pitcher, which is made from heat-resistant glass that rapidly drops the temperature in a matter of minutes. As always, check what material your brewing vessel is made of before attempting this method and ensure that it offers heat-resistant properties.
Time To Brew
Regardless of what vessel you use for making cold brew, the following steps will still apply. For the purpose of consistency, we will be explaining this process using our
Lardera Cold Brew Pitcher.
Step 1
Using a digital scale, weigh out your whole
beans before grinding them.
As previously mentioned, 70g of coffee should produce four flavorful cups in one batch. Accuracy is important in this step since failing to properly portion off your coffee can lead to under or over-extractions.
Use a precise digital scale like our
Lardera Scale & Timer for the most accurate results, down to the last 0.1g.
Step 2
Place your beans in your
grinder and aim for a coarse grind. Pre-ground coffee also works for this process.
Step 3
Place your coarse coffee grounds inside the pitcherâs coffee infuser and pour room temperature water on top. Ensure that your grounds are very well saturated to get the most flavor extracted from your coffee. Because our pitcher is made from heat-resistant borosilicate glass, hot water can also be used at this step. Wait a few minutes for the pitcher to cool down to room temperature before proceeding to the next steps.
It should be noted that our Lardera Cold Brew Pitcher comes with a coffee infuser that also doubles as a filter, but this feature is not necessary for other vessels. Simply pour your grounds into your vessel and use a fine mesh strainer to filter out the used coffee once youâre finished.
Step 4
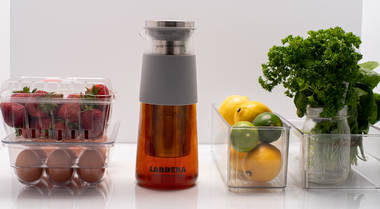
Now that your coffee grounds are fully saturated, itâs time for the next step: waiting. Place your pitcher inside your refrigerator for a minimum of 12 hours. This is perfect for doing in the evenings and letting it sit overnight.
Step 5
After 12 hours have passed, remove the coffee infuser/filter from your Lardera Cold Brew Pitcher and enjoy!
But please note â leaving your infuser inside the filter can lead to over-infusion and bitter coffee. The same applies to loose coffee grounds or coffee bags. Strain and remove all coffee from your cold brew once brewing is complete.
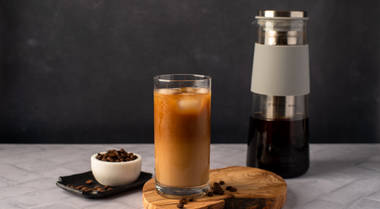
Your concentrated batch of cold brew is now ready to be enjoyed plain, diluted with milk, or poured over ice. If you like your cold brew on the chilled side but fear that ice might dilute its flavor, try making coffee ice cubes beforehand.
Your cold brew should last in your fridge for about three days before needing to be discarded.